页面布局
一个模板文件可以继承和包含其他的模板文件,从而形成一个类似于树的结构。如下图所示,向上的箭头意味着继承,向下的箭头意味着包含。
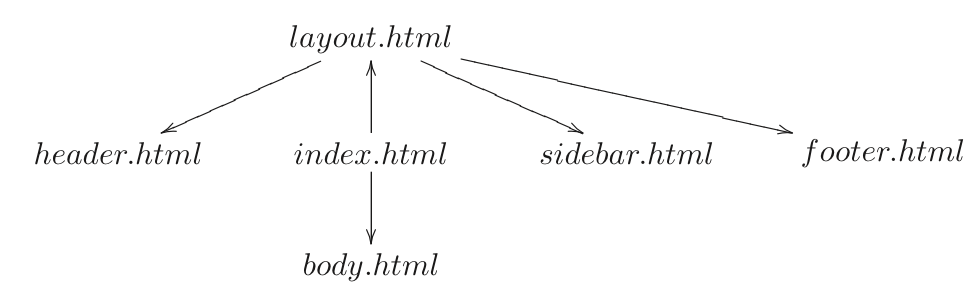
在这个例子里面,模板“index.html”继承了“layout.html”,包含了“body.html”。而“layout.html”包含了“header.html”、“sidebar.html”、“footer.html”。
这棵树的根节点,我们通常称之为“布局视图”。就像其他的HTML模版文件一样,你可以在WEB2PY的管理界面中编辑它。而“layout.html”这个名字只是约定俗成而已。
下面是一个最小的页面示例,既继承自“layout.html”,有包含了“page.html”。
{{extend'layout.html'}}
<h1>HelloWorld</h1>
{{include'page.html'}}
所有被继承的模版文件必须包含一个“{{include}}”辅助函数,就像以下代码所示:
<html><head><title>PageTitle</title></head>
    body>
        {{include}}
    </body>
</head>
当模板被加载的时候,“{{include}}”会被替换成对应的代码。整个过程会被递归执行,直到所有的继承和包含都被处理了。然后模板就会被转换成对应的Python代码惊醒执行。
需要注意的是,extend和include只是表明模板的方向,不是Python的命令。
布局的作用是是用来封装页面中的相同部分的,虽然不是必须的,不过这样做的话,可以使页面易于编写和维护。特别的,我们建议在编写布局的时候,使用以下的变量,这样可以让编写的布局更加通用:
response.title
response.subtitle
response.author
response.keywords
response.description
response.flash
response.menu
这些变量都是字符串。他们的意义就像名字一样显而易见,除了response.menu。response.menu是一个有3元元组组成的列表。元组里面的3个元素代表的含义分别是:链接名、一个布尔值用来标记链接是否是起作用的(就是是否是当前的链接)、链接向页面的URL。下面举个例子:
response.menu = [['Google', False', 'http://www.google.com'],
            ['Index', True, URL(r=request, f='index')]]
我们也推荐你在模板的HTML头部加上下面的代码:
{{include 'web2py_ajax.html'}}
这个html中包含了jQuery库,然后定义了一系列向后兼容的JavaScript函数,用来实现一些特殊的效果和Ajax。
下面是一个小型“layout.html”的实现,符合我们刚才推荐的做法:
<!DOCTYPEhtmlPUBLIC "-//W3C//DTDXHTML1.0Strict//EN" "http://www.w3.org/TR/xhtml1/DTD/xhtml1-strict.dtd">
<html xmlns="http://www.w3.org/1999/xhtml" xml:lang="en" lang="en">
<head>
    <!-- define the meta tags -->
    <meta http-equiv="content-type" content="text/html; charset=utf-8" />
    <meta name="keywords" content="{{=response.keywords}}" />
    <meta name="description" content="{{=response.description}}" />
    <meta name="author" content="{{=response.author}}" />

    <!-- choose a title or use the application name -->
    <title>{{=response.title or request.application)}}</title>

    <!-- include jQuery and other ajax functions -->
    {{include 'web2py_ajax.html'}}

    <!-- include a style.css file and optional js files -->
    <link href="{{=URL(r=request, c='static', f='style.css')}}"
            rel="stylesheet" type="text/css"/>
</head>
<body>

<!--build your header-->
<div class="header">[Here goes the header]</div>

<!--here is the menu-->
{{ifresponse.menu:}}
<div id="menu">
<ul>
    <!-- loop over menu items -->
    {{=for _name, _active, _link in response.menu:}}
        <li><a href="{{=_link}}" class="{{='active' if _active else
            'inactive'}}">{{=_name}}</a></li>
    {{pass}}

</ul>
</div>
{{pass}}

<!--here is the flash message-->
<div id="flash">{{=response.flash or ''}}</div>

<!--here the extending view is included-->
{{include}}

<!--here is the footer-->
<div class="footer">[created by {{=response.author}} with web2py]</div>
</body>
</html>
在布局的时候,有时候需要在子模板里面显示变量。实现的方法就是把变量定义在“继承”操作的前面。这样的话,这些变量就可以在多个地方使用了。根据这个思路,我们可以在模板里面定义一些函数来生成一个页面的不同部分(比如主体,导航条等等),然后在不同的布局中渲染他们。这些函数会在模板渲染的时候调用。
下面是一个布局示例:
<html><body>
{{include}} <!--must come before the two blocks below -->
whatever html
{{maincontent()}}
whatever html
{{if 'sidebar' in globals(): sidebar()}}
whatever html
</body></html>
“maincontent”函数和“sidebar”函数都在子模板里面定义。尽管在这个例子里面,我们允许模板没有定义“sidebar”函数。下面是相关的模板:
{{def sidebar():}}
<h1>This is the sidebar</h1>
{{return}}
{{def maincontent():}}
<h1>This is the maincontent</h1>
{{return}}
{{extend'layout.html'}}
需要注意的是,这些函数是在HTML里面被定义的(尽管他们可以包含Python代码),所以他们直接调用response.write方法将生成的内容写进response里面,而不是将生成的内容返回。所以,在模板里面调用这些方法的时候,需要用{{maincontent()}}而不是{{=maincontent()}}。